e-CAM31_TX2 - 3.4 MP Autofocus liquid lens Camera from e-con Systems
The e-CAM31_TX2 with a 3.4 Mega Pixel and Autofocus liquid lens is a camera developed by e-con Systems, an Indian company focused in OEM products since 2003 and in partnerships with big corporations such as NVIDIA®, NXP, TI and Cypress.

The company has a variety of products such as USB 3.0 cameras (from 2MP up to 13.0 MP), computer-on-modules based on NVIDIA Jetson TK1, NXP processors and others available on e-con Systems website.
This review is basically divided into three different steps: e-CAM31_TX2 hardware analysis, camera set up and then results obtained.
Unboxing
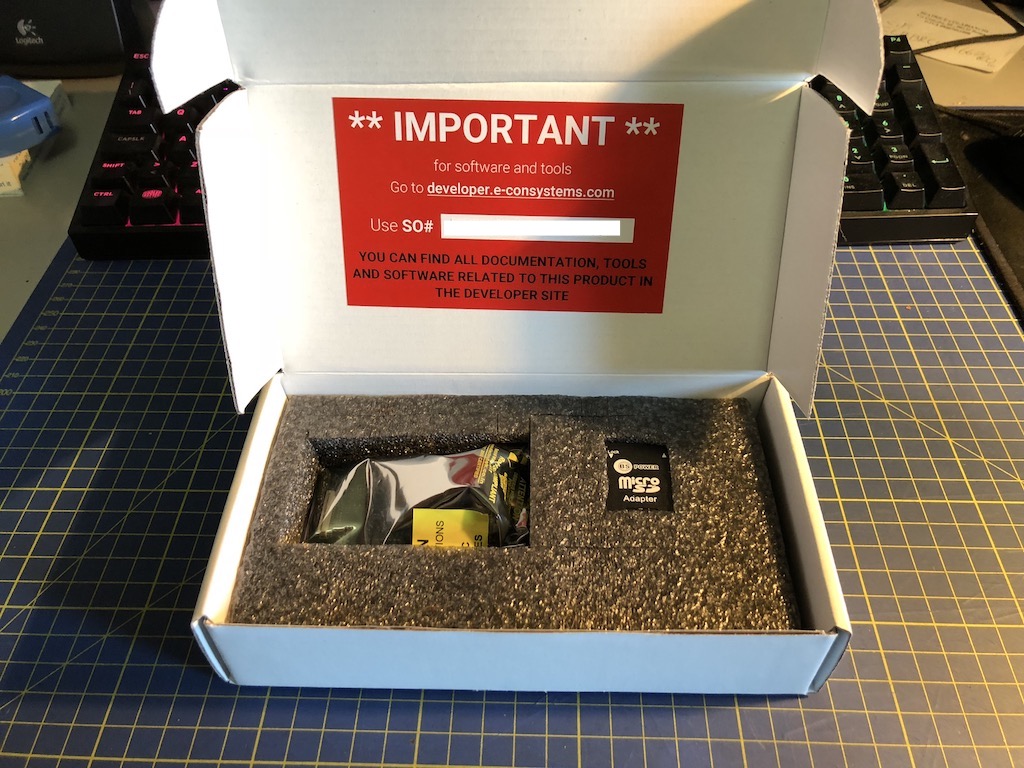
The product comes in a little cartoned box cushioned by foam. There is a sticker sign with an instruction of how to find updated documentations, tools and further information on the e-con System developer’s website.
The reference website is: http://developer.e-consystems.com (registration required to have access to the device latest documentation).
List of components:
- e-CAM31_TX2 kit:
- e-CAM31_TX2 module
- Liquid lens
- e-CAM31_TX2 adapter for NVIDIA Jetson TX1/TX2 development kit
- MicroSD card (Includes drivers for NVIDIA Jetson TX1 and Jetson TX2)
Hardware
You can connect the camera e-CAM31_TX2 via Jetson TX1/TX2 adaptor, its plug and play. It’s possible to use the camera individually (without Jetson TX1/TX2 adaptor). However, it may require some extra setup.
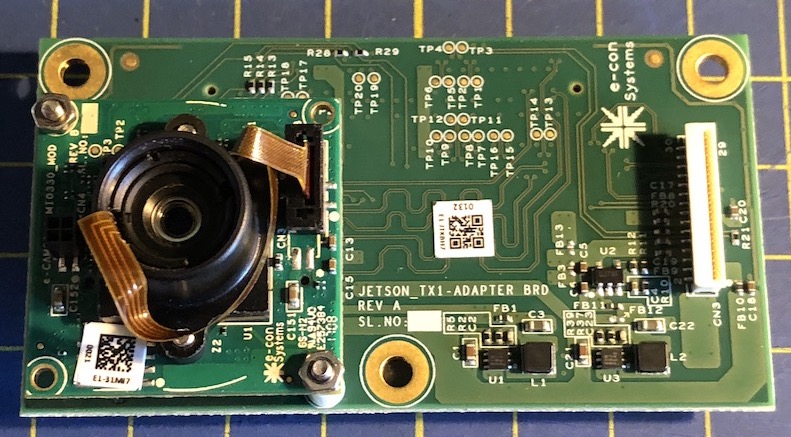
The e-CAM31_MI0330_MOD (size 30mm x 30mm) has a two dual rows 20-pin connectors. The module receives the power supply and all input/output data from the adapter connected to the Jetson TX1/TX2. The S-Mount lens holder’s size is 13mm and it is placed at the center of the module board.
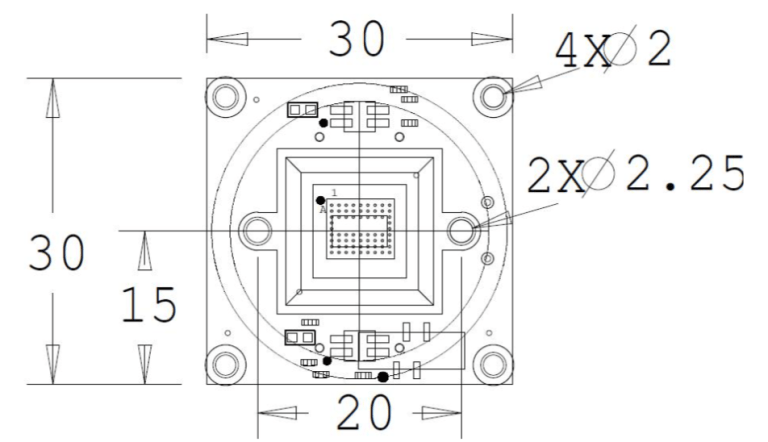
The e-CAM31_MI0330_MOD liquid lens are compatible with most imaging sensor formats, with a focal lens up to 1/2.3.
Generic information are shown below:
| Effective focal length | 4.67 mm |
| F number | 2.0 |
| Image circle diameter | 8.37 mm |
| Focus Range | 7cm to infinity |
- M12x0.5 thread
- Built-in Auto Focus actuator from 7 cm to infinity
- Built-in IR-cut filter
For camera individual usage, the connector CONN FFC VERT 30POS 0.50MM SMD from the Molex, LCC manufacturer, is required.
Relevant note about the temperature operative system:
When operating beyond 60°C, the image quality is affected badly with thermal flickering noise all over the image. Continuously operating the camera at 85°C (maximum value) will cause irreparable damage to the camera module. Customers are advised to make necessary arrangements on their products to dissipate the heat generated in the module to maintain the operating temperature below 60°C
The following table shows different power consumption with a different type YUV422 setup. These measures were taken when tested under a controlled environment.
| S. No | Resolution | Supply Voltage (V) | Typical Current (mA) | Power Consumption (W) |
|---|---|---|---|---|
| 1 | 640 x 480 at 50 fps | 5 | 245 | 1.225 |
| 2 | 1280 x 720 at 60 fps | 5 | 260 | 1.300 |
| 3 | 1920 x 1080 at 60 fps | 5 | 263 | 1.315 |
| 4 | 2304 x 1296 at 60 fps | 5 | 265 | 1.325 |
| 5 | 2304 x 1536 at 50 fps | 5 | 270 | 1.350 |
Software
Camera drivers, documentation and installation scripts are available inside the MicroSD which comes with the package. Zipped files listed below:
- e-CAM31_TX2_JETSON_TX1_RELEASE_PACKAGE_V1.01-14-07-2017.tar
- e-CAM31_TX2_JETSON_TX2_RELEASE_PACKAGE_V1.02-12-07-2017.tar
In addition to that, there is a Getting Started Manual to guide you with first steps of installation. File example listed below:
- e-CAM31TX2_Getting_Started_Manual_Rev
.pdf
Installation
To install the driver of the e-CAM31_TX2 are available two different ways, where the first one is a launch shell script to download the camera driver and the application script to check if the camera work. The second install from scratch the NVIDIA Jetson kernel and OS in the embedded board.
The driver is a patch for the different version of the kernel, in detail:
- Jetson TX1 require the kernel R24.2 and other release doesn’t works.
- Jetson TX2 require the kernel R27.1 and other release doesn’t works.
The following paragraphs show the installation procedure for the Jetson TX1 and after for the Jetson TX2 and the last paragraph explain how to run the camera from the NVIDIA Jetson TX1 or TX2
Install only drivers (NVIDIA Jetson TX1)
To launch the script is required to execute install_tx1_bins.sh from the NVIDIA Jetson TX1 board. The comment of the script report:
This script is meant to be used only when flashing the TX1 board is not an option.
This script preserves the existing rootfs of the Jetson TX1.
Only the camera related binaries and libraries are updated.
Pre-requisites for this script is that the board should be already using L4T_R24.2 (aarch64)
In case any other version of L4T is being used, the results are unknown and untested.
The script install the kernel patch, update the rootfs and add the application to show the camera in action. Finally update the bashrc with the application binaries reference.
It’s kindly recommended to use the L4T_R24.2 (aarch64) otherwise the Jetson TX1 will be blocked after relaunch.
Install from scratch (NVIDIA Jetson TX1)
In this case the installation is completely different and require an erase of the board. Following the “Recovery mode procedure” in the host PC is required to go in the Quick_Start folder and proceed with the following command:
sudo tar jxpf quick_start.tar.bz2
cd Linux_for_Tegra/
Now flash the Jetson kit using the flash.sh script from your Host PC. This procedure will take about 10 minutes to complete.
sudo ./flash.sh jetson-tx1 mmcblk0p1
After it is complete, reboot the Jetson TX1.
This version install an Ubuntu 16.04 LTS with the Kernel Release R24.2
Install only drivers (NVIDIA Jetson TX2)
In this case you can run the script install_tx2_bins.sh from the NVIDIA Jetson TX2 board, but is require to work with the release of kernel L4T_R27.1 (aarch64)
This script is meant to be used only when flashing the TX2 board is not an option.
This script preserves the existing rootfs of the Jetson TX2.
Only the camera related binaries and libraries are updated.
Pre-requisites for this script is that the board should be already using L4T_R27.1 (aarch64)
In case any other version of L4T is being used, the results are unknown and untested.
The periods in quote above are written inside the script and is mandatory to check if you are working with the same version of the kernel otherwise your Jetson will be compromise.
Install from scratch (NVIDIA Jetson TX2)
Following the instruction in the quick start guide, the NVIDIA Jetson TX2 will be ereased. Following the “Recovery mode procedure” in the host PC execute the commands:
sudo tar jxpf quick_start.tar.bz2
cd Linux_for_Tegra/
Now flash the Jetson kit using the flash.sh script from your Host PC. This procedure will take about 10 minutes to complete.
sudo ./flash.sh jetson-tx2 mmcblk0p1
After it is complete, reboot the Jetson TX2.
This version install an Ubuntu 16.04 LTS with the Kernel Release R27.1
Startup and run
(This section is in common for both NVIDIA Jetson TX1 and NVIDIA JetsonTX2)
Open a terminal window in the Jetson TX1 or TX2.
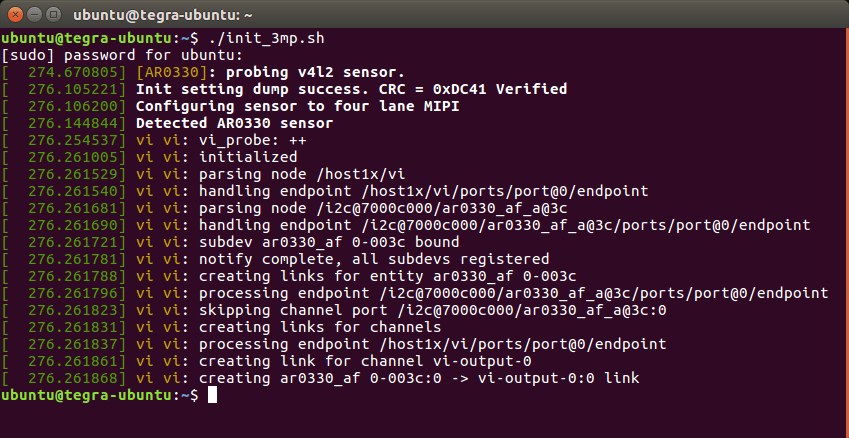
./init_3mp.sh
After this command will be shown this status from the terminal otherwise the camera is not well loaded
After this step the Camera is ready and from the viewer is possible to control the status of the camera
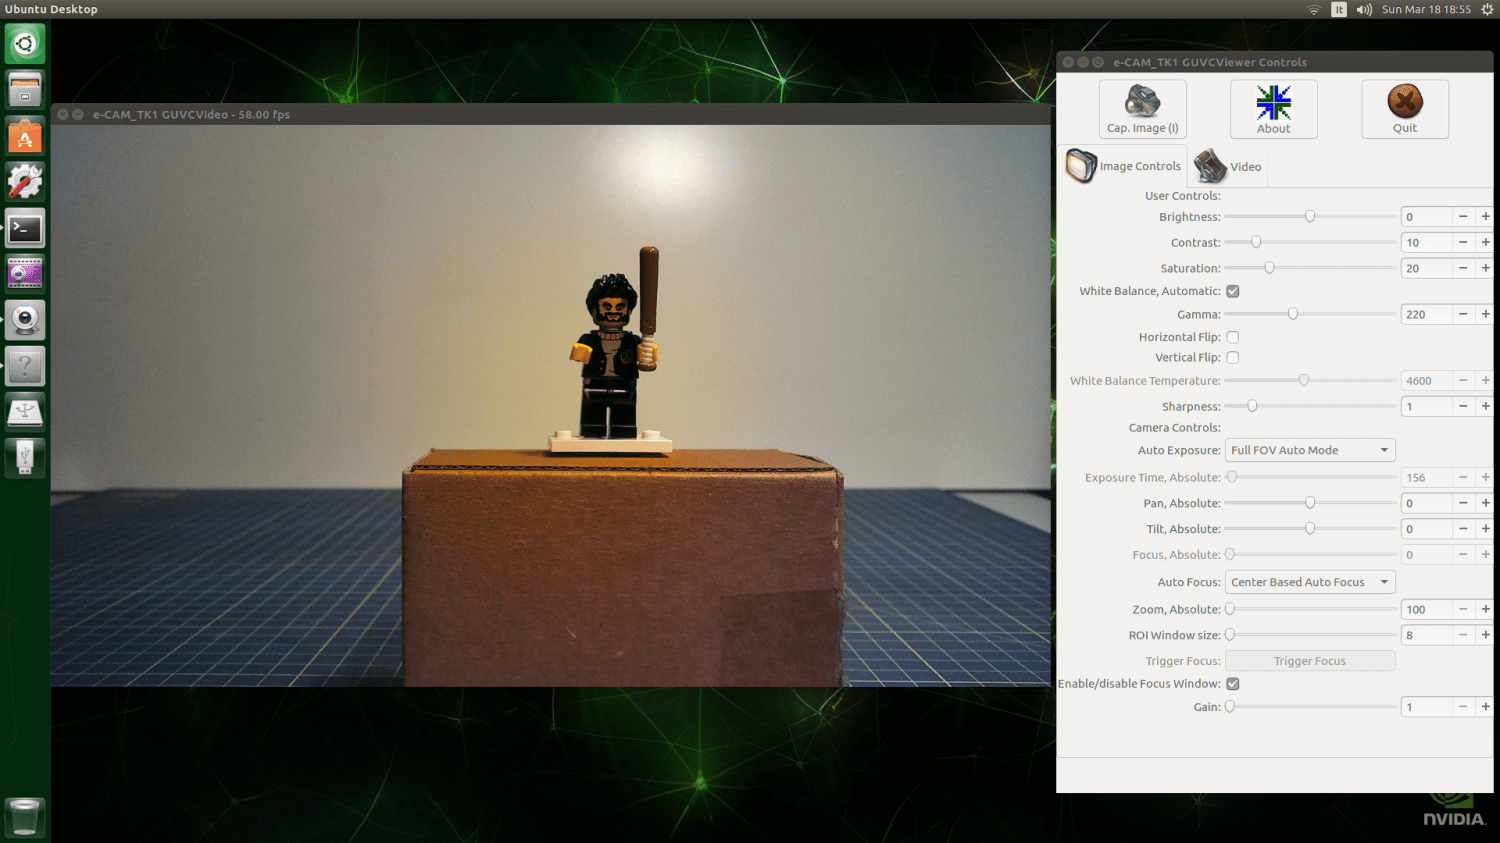
ecam_tk1_guvcview
They will be shown the windows to control the setup of the camera and the camera view look like the following picture:
Video Test
In the following video is tested the quality of the camera to evaluate the quality of the auto focus.
The camera responds fast when the scene change, but sometimes at short distance the object is not quickly on focus.
Conclusion
This camera is ideal for surveillance, Business monitoring system, medical and much more. With support for 3A (AE,AWB,AF), the e-CAM31_TX2 camera can be used for high quality imaging applications. It can also be used for NIR imaging and day-night imaging application with an IR pass through lens (available via customization).
The support from the company is fast and good, you can obtain in short time all clarifying information to install the camera on your Jetson TX1 or TX2, otherwise the camera use an installation system with a kernel patching. This solution sometimes can compromise your Jetson.
The following table show the pro versus con of the camera.
| Pro | Con |
|---|---|
| Ideal for survelliance | The driver are released only with a kernel update and the release are not frequently updated: * Kernel R24.2 for Jetson TX1 * Kernel R27.1 for Jetson TX2 |
| Short size: 2cm x 2cm |
Sometimes the auto focus is slowly to focus the object |
| Standard connector |
Technical informations
- Houses e-CAM31_MI0330_MOD – 3.4 MP Camera Module with S-mount lens holder
- High-speed 4-lane MIPI CSI-2 interface to connect with the CPU
- Plugs in to NVIDIA® Jetson TX2 and TX1 Developer Kit
- Maximum Image Transfer Rate
| Resolutions | Uncompressed YUV422 |
|---|---|
| VGA | 50 fps |
| HD (720p) | 60 fps |
| Full HD (1080p) | 60 fps |
| 3MP | 60 fps |
| 3.4 MP | 50 fps |
- Operating Voltage – 5V +/- 5%, Current – 270mA (Max)
- Operating Temperature Range : -30°C to 85°C
- Power consumption of Camera Board : 1.35W (Approx)
- Linux camera driver (V4L2) for 3.4 MP MIPI CSI-2 camera module
- Sample application for image capture & Preview
- Gstreamer-1.0 support for video recording and network streaming
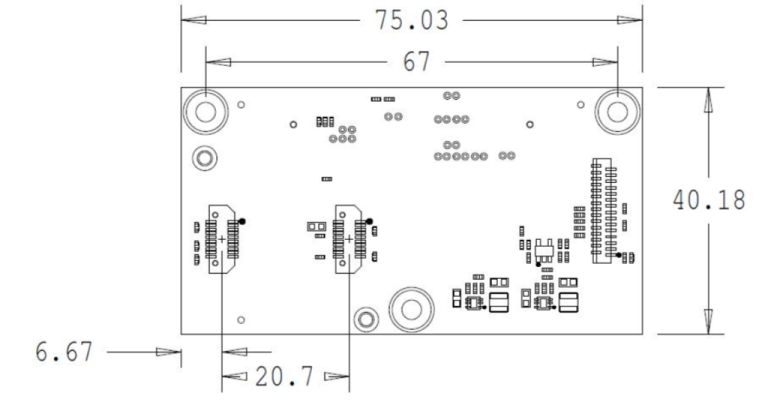
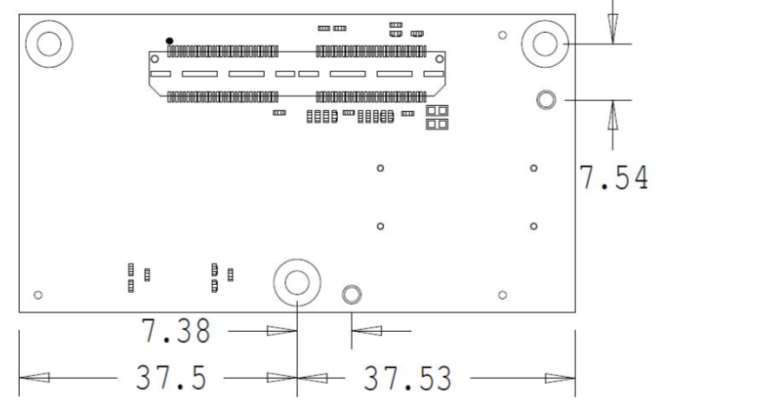
- Board size( L x W x H): 75.03 mm x 40.18 mm x 25.6 mm
- Board Weight – 22 Grams (with lens)
- RoHS compliant
- Lightweight, versatile, and portable two-board solution